 |
| Grilled italian sausage |
Wednesday, August 31, 2011
Grillin' Machine
Cavewoman Breakfast
 |
| Fried Egg, Chicken Sausage, and Avocado |
Eat your Veggies!
 |
| Roasted Asparagus with Vidalia Onion and Sun Dried Tomato Saute |
Asparagus (like green beans actually) is quick cooking and super versatile. I always try to make it taste really good. I sometimes wrap proscuitto around the asparagus and cook it like that or I will serve it with an aioli. Sometimes, I will blanch them and serve them cold with other vegetables covered in a vinaigrette. Last night, I used leftover Vidalia onions and sun dried tomatoes. It was really tasty. Here is what I did.
Asparagus with Onion and Sundried Tomato Saute
1 bunch of asparagus
1/4 vidalia onion diced
6 oil packed sundried tomatoes chopped (keep the oil)
salt and pepper
Again, I used my trusty castiron griddle. I love it so! I heated it up super hot and sauteed my onions in some of the oil from the tomatoes (no need wasting that tasty stuff). When soft, I moved them over and added my asparagus. To prep asparagus, bend each stalk. It should break easily at the base. Discard the bottom part (it is woody and tough). Place asparagus on hot griddle. Let sit. Salt and Pepper. Move around slightly but leave them unattended primarily. This should take about 7 minutes. You don't want overcooked asparagus. Gross. Move them around and allow them to char. When they are finished, scatter onions and sundried tomatoes on top. Salt and Pepper to taste. The stalks should be crisp-tender. I served these with a stuffed bell pepper. Yummy!
Tuesday, August 30, 2011
You Won't Miss those Mashed Potatoes
Last night, I made Paleo Potatoes, which in reality was pureed cauliflower. Man were they good! It was super funny to see my husband's face who thought they were mashed potatoes only to find out that they were not. In the fall and winter I love to eat roasted meat, like lamb shank, beef short ribs or roasted chicken, on top of mashed potatoes. Well this year, I will have to be creative....last night, I steamed and pureed cauliflower and served it with roasted chicken with whole garlic cloves and a pan sauce. Here is how I did it.
Roasted Chicken Legs and Garlic with Pureed Cauliflower
Roasted Chicken (Serves 2 with some leftovers)
1 package of organic chicken parts (whatever you like. I used 6 free-range chicken legs)
3 tbls of extra virgin olive oil
10 cloves of peeled garlic
Salt and pepper
350 degree oven
1) Put olive oil in pan on medium to medium high heat. Add garlic cloves
2) Let saute until golden brown-Remove
3) Salt and pepper the chicken on both sides
4) Turn up heat and add chicken
5) Brown until golden-5 minutes per side.
6) Add garlic back in and transfer to 350 degree oven
7) When finished, juices should run clear or a thermometer should read 160
Pan Sauce
I made a pan sauce for the chicken. It was super simple. Remove the chicken from the pan. Place aside. Turn on a burner on medium high heat. Pour 1/2 to 1 cup of chicken stock in the hot pan. Scrape up the browned fatty bits on the bottom of the pan. Squirt in some mustard and whisk. Let the sauce reduce some. Mine was naturally pretty thick because I did not add too much liquid in the first place. Taste and spoon over chicken and cauliflower.
Pureed Cauliflower (serves 4)
1) Cut cauliflower into florets
2) Place florets on a steamer basket
3) Steam for 10-15 minutes
4) Put half of the florets in the food processor and pulse
5) Add the rest of the cauliflower
6) Season like you would mashed potatoes (butter, cheese, sour cream or olive oil)
7) I added 3 tbls of butter, leftover ricotta cheese, and a big dollop of greek yogurt
8) Add salt and pepper, but taste as you go
9) Serve hot with any type of meat
This is yet another way to eat organic and low-carb. I didn't miss those mashed potatoes one bit.
 |
| It is easier to cut up the cauliflower if the base is cut off first |
 |
| Steamed cauliflower in the food processor |
 |
| Pureed cauliflower with butter, ricotta cheese, and greek yogurt |
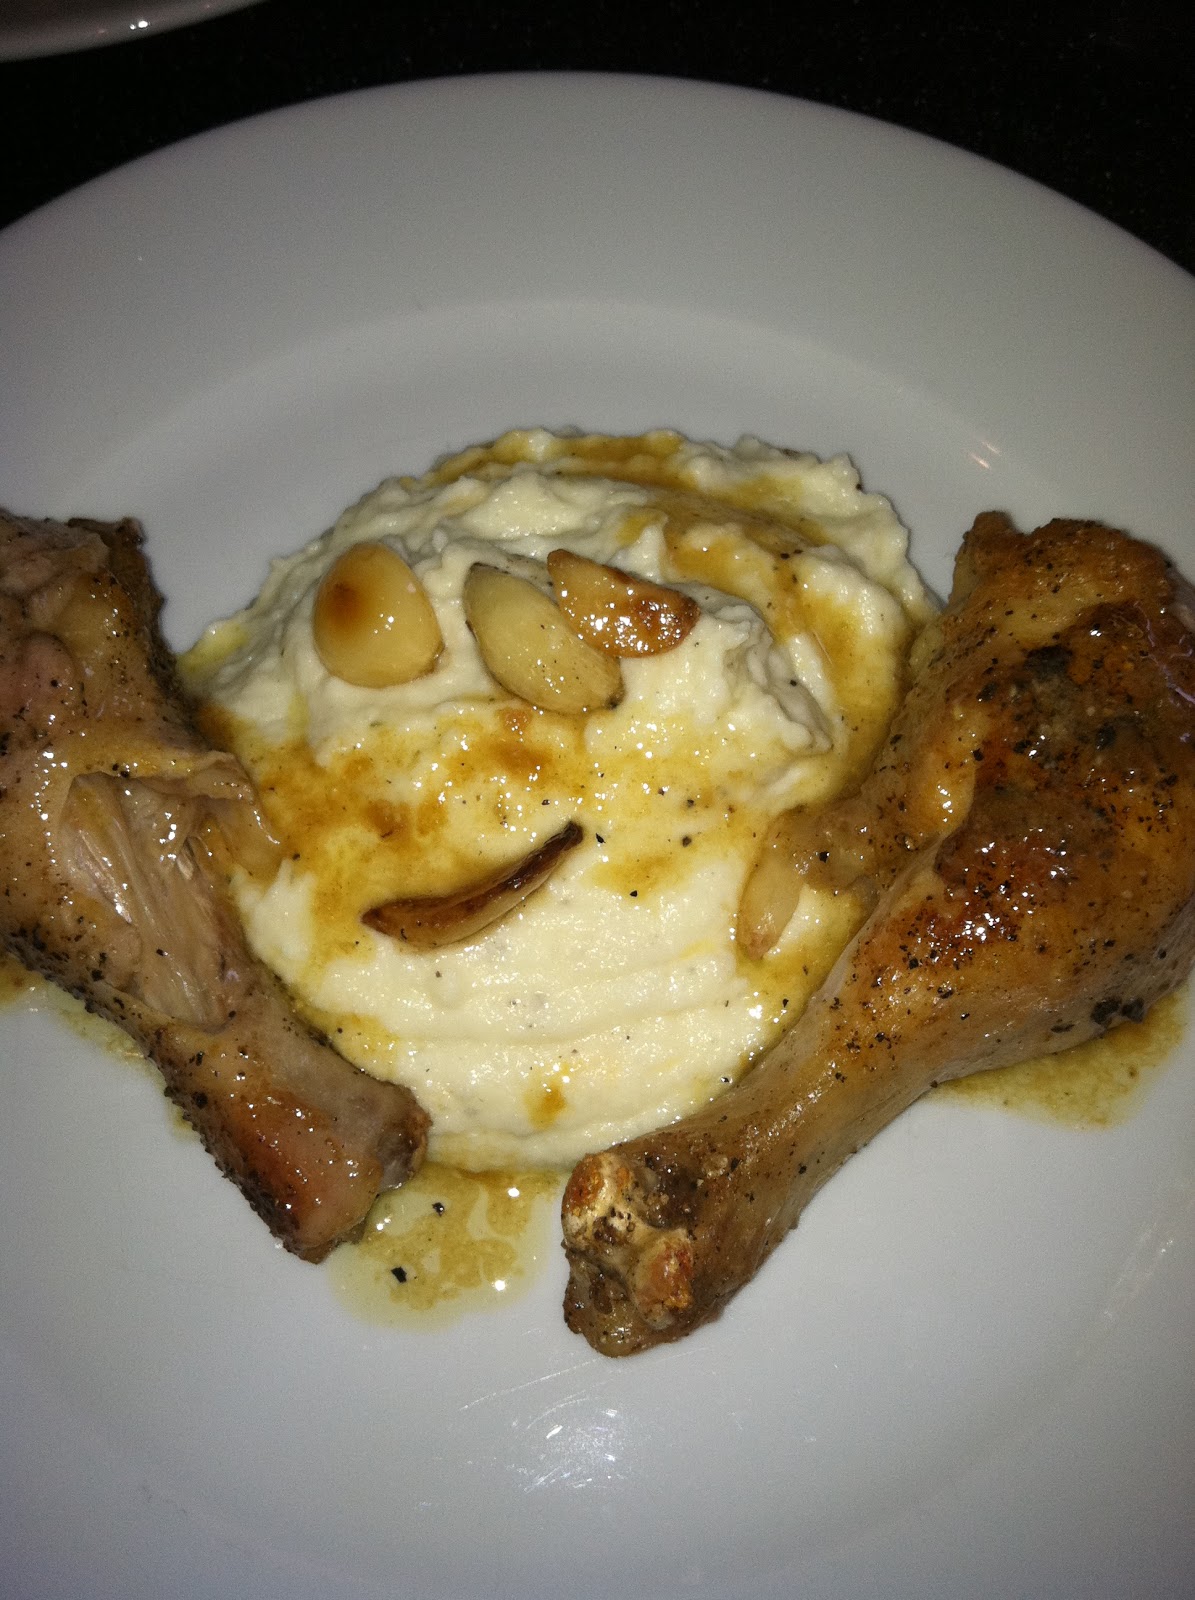 |
| Roasted chicken legs, whole roasted garlic cloves, and pureed cauliflower with a pan sauce |
Roasted Chicken Legs and Garlic with Pureed Cauliflower
Roasted Chicken (Serves 2 with some leftovers)
1 package of organic chicken parts (whatever you like. I used 6 free-range chicken legs)
3 tbls of extra virgin olive oil
10 cloves of peeled garlic
Salt and pepper
350 degree oven
1) Put olive oil in pan on medium to medium high heat. Add garlic cloves
2) Let saute until golden brown-Remove
3) Salt and pepper the chicken on both sides
4) Turn up heat and add chicken
5) Brown until golden-5 minutes per side.
6) Add garlic back in and transfer to 350 degree oven
7) When finished, juices should run clear or a thermometer should read 160
Pan Sauce
I made a pan sauce for the chicken. It was super simple. Remove the chicken from the pan. Place aside. Turn on a burner on medium high heat. Pour 1/2 to 1 cup of chicken stock in the hot pan. Scrape up the browned fatty bits on the bottom of the pan. Squirt in some mustard and whisk. Let the sauce reduce some. Mine was naturally pretty thick because I did not add too much liquid in the first place. Taste and spoon over chicken and cauliflower.
Pureed Cauliflower (serves 4)
1) Cut cauliflower into florets
2) Place florets on a steamer basket
3) Steam for 10-15 minutes
4) Put half of the florets in the food processor and pulse
5) Add the rest of the cauliflower
6) Season like you would mashed potatoes (butter, cheese, sour cream or olive oil)
7) I added 3 tbls of butter, leftover ricotta cheese, and a big dollop of greek yogurt
8) Add salt and pepper, but taste as you go
9) Serve hot with any type of meat
This is yet another way to eat organic and low-carb. I didn't miss those mashed potatoes one bit.
Monday, August 29, 2011
Eating like a Caveman: Sushi Style
 |
| Seared Ribeye layered with tomato, avocado, and sprinkled with raw onion |
 |
| Tuna Poke on top of thinly sliced cucumbers |
Steamed Artichokes with Lemon Aioli
I have recently branched out and made some fresh artichokes. I have always loved them, but have been super scared to actually buy the fresh ones. They are intimidating with all of those spikes. I attempted them a couple weeks ago and with the guidance of my aunt who lives in Turkey, I decided to steam them and serve them as an appetizer. Last night, I cooked them again and they were even better this time. When steamed, the leaves of the artichokes pull off very easily. My husband and I dipped each little leaf in a delicious lemony mayonnaise. We demolished those artichokes and left nothing but a pile of leaves and fur. Here is how I did it.
Steamed Artichokes (serves 2)
Ingredients:
2 Medium sized artichokes
1 Lemon
Salt and Pepper
2 Tbls Mayonaise with Olive Oil
2 Tbls Greek Yogurt (2% or total)
Splash of Red Wine Vinegar
There are several steps to cleaning artichokes.
1) Pull off hard leaves at the bottom of the artichokes. About one row of leaves is sufficient.
2) Cut off bottom of artichoke at the base (see picture)
3) Cut off top one inch of artichoke
4) Using scissors, cut off the spikes on the end of each leaf
Once the artichoke is cleaned (it does not have to be perfect), get a steamer basket out. I use a red rubber insert that I put in the bottom of a pan. Place the artichokes on top. Turn on burner and cover for 30 minutes. Don't forget to make sure there is enough water throughout the steaming process. Mine evaporated last night and was slightly smelly before I added more water.
Once steamed, place aside. They are hot. Serve with lemon aioli.
Lemon Aioli Recipe*
*A traditional aioli is a homemade mayonnaise with additions like garlic, lemon or herbs. I didn't make my own mayonnaise. I took store bought help. Feel free to rock your own mayo if you choose.
2 tbls store bought mayo (I use organic olive oil mayo, but any mayo is fine)
2 tbls greek yogurt (not non-fat)
Splash of red wine vinegar
Salt and Pepper
Zest of half a lemon
Splash of Olive Oil
In a small bowl, measure out yogurt and mayo. Mix. Add in a splash of vinegar. Mix. Season with salt and pepper. Mix and taste. Zest half a lemon into the mixture. Mix again and splash with olive oil. Taste. This is such an easy sauce that is good on asparagus, green beans and meats, like fish and chicken. This recipe is wonderful and a nice way to incorporate veggies into picky eaters. Happy eating.
 |
| Discarded Artichoke Parts |
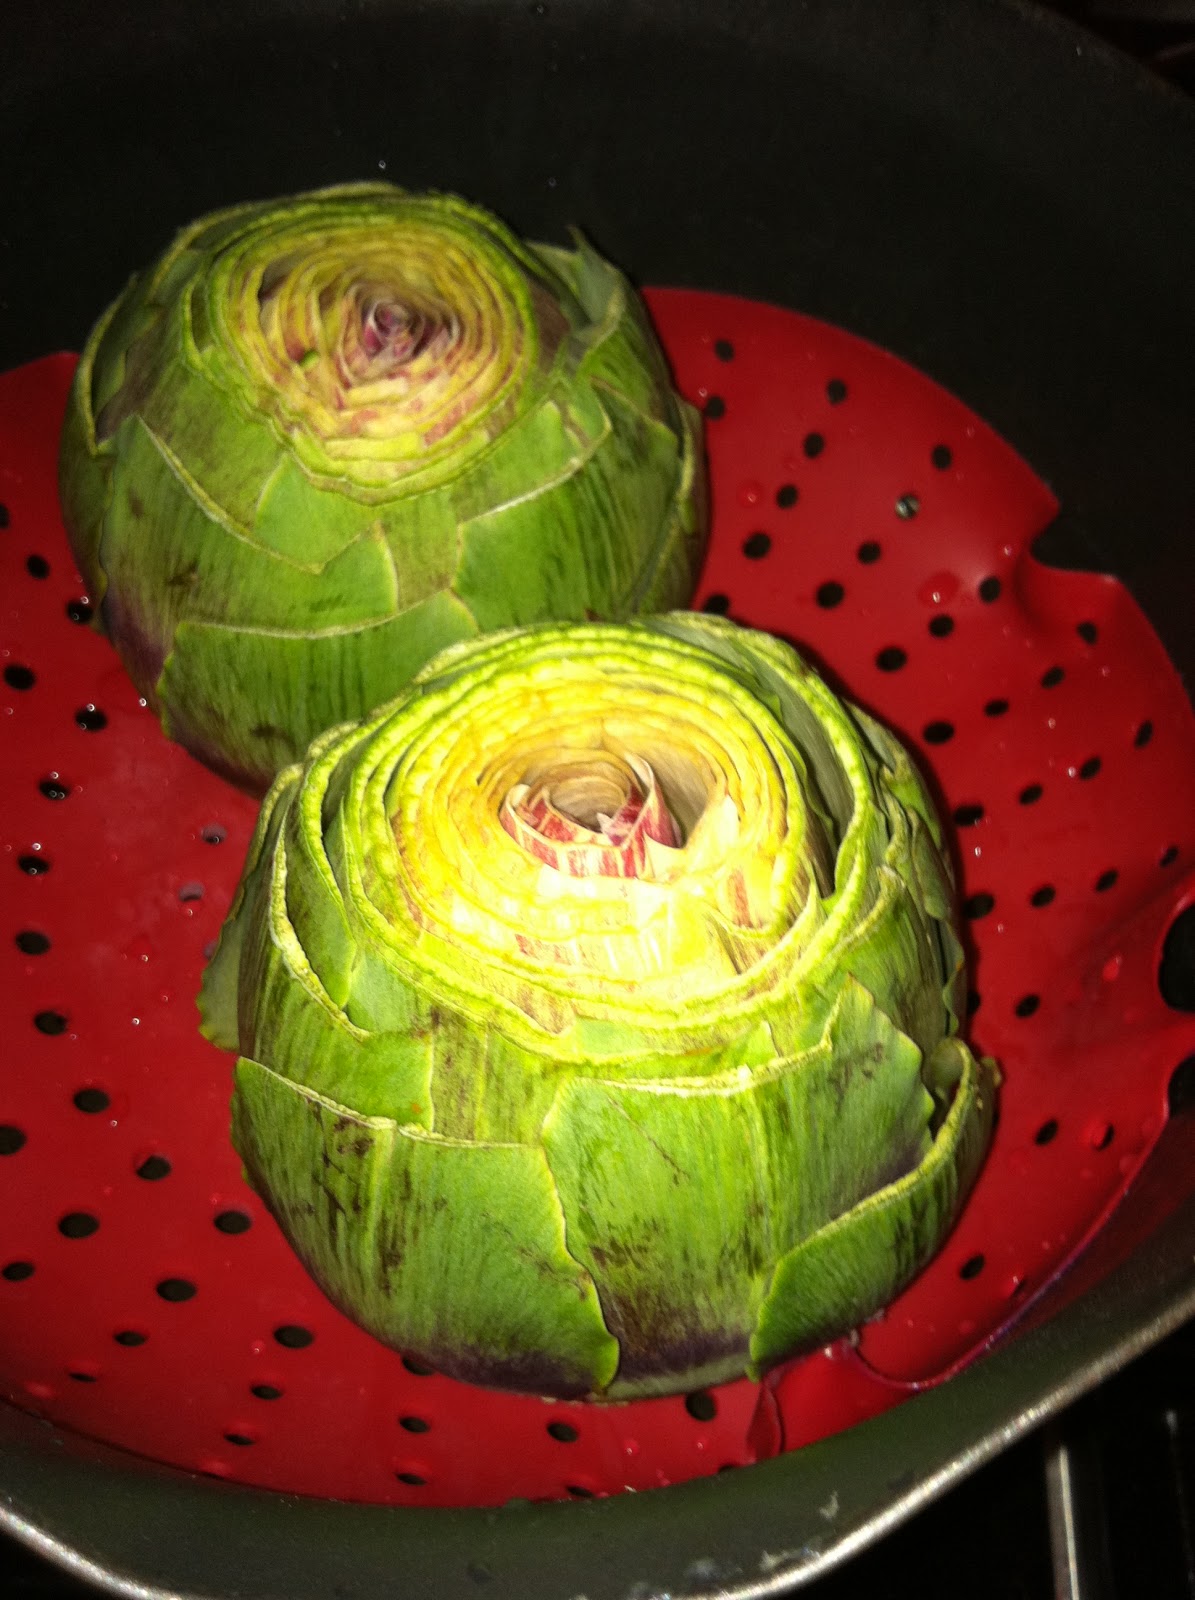 |
| Cleaned Artichokes on a steamer basket |
 |
| Finished product after 30 minutes of steaming |
Steamed Artichokes (serves 2)
Ingredients:
2 Medium sized artichokes
1 Lemon
Salt and Pepper
2 Tbls Mayonaise with Olive Oil
2 Tbls Greek Yogurt (2% or total)
Splash of Red Wine Vinegar
There are several steps to cleaning artichokes.
1) Pull off hard leaves at the bottom of the artichokes. About one row of leaves is sufficient.
2) Cut off bottom of artichoke at the base (see picture)
3) Cut off top one inch of artichoke
4) Using scissors, cut off the spikes on the end of each leaf
Once the artichoke is cleaned (it does not have to be perfect), get a steamer basket out. I use a red rubber insert that I put in the bottom of a pan. Place the artichokes on top. Turn on burner and cover for 30 minutes. Don't forget to make sure there is enough water throughout the steaming process. Mine evaporated last night and was slightly smelly before I added more water.
Once steamed, place aside. They are hot. Serve with lemon aioli.
Lemon Aioli Recipe*
*A traditional aioli is a homemade mayonnaise with additions like garlic, lemon or herbs. I didn't make my own mayonnaise. I took store bought help. Feel free to rock your own mayo if you choose.
2 tbls store bought mayo (I use organic olive oil mayo, but any mayo is fine)
2 tbls greek yogurt (not non-fat)
Splash of red wine vinegar
Salt and Pepper
Zest of half a lemon
Splash of Olive Oil
In a small bowl, measure out yogurt and mayo. Mix. Add in a splash of vinegar. Mix. Season with salt and pepper. Mix and taste. Zest half a lemon into the mixture. Mix again and splash with olive oil. Taste. This is such an easy sauce that is good on asparagus, green beans and meats, like fish and chicken. This recipe is wonderful and a nice way to incorporate veggies into picky eaters. Happy eating.
Sunday, August 28, 2011
Eggplant and Lamb Bake a la Greece
 |
| Red wine added to ground lamb browned with onion, garlic, and celery. |
 |
| Eggplant slices cooked on the griddle |
 |
| Meat mixture poured over grilled eggplant |
 |
| Finished product. It was wonderful |
My husband and I went to Greece this summer. It was a magical trip and we pretty much ate at every hole in the way taverna we could find. If they didn't speak English, that was fine by us. Pointing and smiling goes a long way. One day, after walking in the scorching heat for way too long, we happened upon this taverna is the Psiri. Only Greek people were eating there and that is always a good sign. We went and pointed at our food, which was behind glass in a buffet of sorts. The chef was behind the glass. I was skeptical of this approach, but my adventurous hubs said that we would stay. We pointed to a lamb shank with oregano sauce (served everywhere we went) and a meat stuffed eggplant. Wow, were they both good! We ate every last stinkin bite of that food and washed it down with a carafe of red wine and a cold Mythos beer. Here is my take on this dish.
Eggplant and Lamb Bake (serves 2 healthy eaters plus one healthy leftover portion)
Ingredients:
1/2 pound good quality ground lamb
1/2 onion
2 stalks celery
2 cloves garlic
2 TBLS of tomato paste
Wine for deglazing (stock would be okay)
1-2 large and firm eggplants (depending on if you want two layers of eggplant or one)
1/2 Fresh tomato
1/2 to 1 cup Raw Milk Fresh Ricotta
Fresh Parsley for garnish
EVOO/butter
Steps:
1) Sautee chopped onion and celery (season as you go) in a mixture of olive oil and butter
2) When onions/celery are soft, add ground lamb-brown
3) Add tomato paste-stir
4) Deglaze with red wine (whatever you have open)-maybe around a 1/2 cup
5) Cover and let cook for 1-2 hours (stirring occasionally). The longer it cooks, the richer it tastes
6) 45 minutes before ready to eat, slice eggplant into 1/2 inch slices
7) Either grill them inside or put them in the oven at 400
8) When soft, remove them and layer them in a greased pan. Overlap the eggplant so that they all fit
9) Dollop meat sauce onto eggplant
10) Dollop ricotta onto each slice
11) Place a small piece of fresh tomato onto each slice
12) Drizzle with olive oil, sprinkle with parsley and parm (optional)
13) Put in 400 degree oven and cook for 25-30 minutes until bubbly
14) Serve with green salad and a glass of red wine
Now eating in my backyard is nothing like eating at an Athens taverna, but it was pretty darn nice.
Saturday, August 27, 2011
Channel your inner Parisian
 |
| Notre Dame |
Well, my lovely sister is in Paris with her hubby and it has me thinking about all things French. One thing I have learned about French cooking is simplicity, attention to detail, quality and classic techniques. Granted, many classical recipes are completely complicated and laborious. People say that the French bistros are where the food is the best. Think roasted chicken, potatoes cooked in chicken fat, mussels in wine, french baguettes, and bordeaux. One of my favorite salads of all time is a poached egg on top of frisee with lardons. Yes please! The people of France are glamourous and they LOVE food....like really love food. I always wondered why I was not born Italian or French or Spanish for that matter.
I am going to channel my inner parisian this weekend and eat my dinner slowly, paying attention to flavor and quality of ingredients. I will engage in meaningful conversation with my husband and enjoy my life....with a bottle of French wine of course. Bon Appetit...
Cook like a Pro: #1
I think of myself as a skilled home cook. It is an area of passion for me and I spend a lot of time reading, researching and thinking about food. My sweet husband says that the best restaurant in Evanston is our home kitchen. He got major points for that compliment. He is sometimes right though. At my house, I know what is in the food. I know where it came from and how much fat/salt it has. My kitchen is a space of creativity and excitement. I have learned over the years how to make my food taste good. Here are some of my tricks.
The Basics
1) Own a high quality chef's knife, bread knife, boning knife and perhaps a pairing knife.
2) Own several heavy bottomed copper, cast-iron or ceramic pans. This is all you need.
3) Cook with herbs, like parsley, thyme, rosemary, cilantro, and sage. Sprinkle them on finished dishes or add them to dishes as they simmer, like soups, sauces, and/or one-skillet dishes.
4) Use citrus, like lemon, orange or limes. They add tons of flavor to fish, chicken, and mixed vegetables. Squirt them or grate/zest the citrus skin on the food when it is finished.
5) Keep vinegars, mustard, olive oil, butter, and hot sauce on hand. Use them!
6) Own the Joy of Cooking (it is a go-to for learning the basics. I refer to mine frequently!)
7) Don't be afraid to massage the meat. Utilizing rubs when cooking meat is so easy and really pays off. Put blackened rubs, simple rubs of garlic, salt, and pepper, or herbed rubs on chicken, pork and beef.
8) Own a digital meat thermometer. They will save your ass!
9) Learn how to deglaze. This simply refers to pouring either wine, beer, liquor or stock into a pot after the meat has been removed. Scrape up the bits and pour on top of meat before serving.
10) Cook with fat, either olive oil, bacon drippings, or butter. I don't mean an obscene amount like Paula Dean, but a TBL of oil or butter really boosts the flavor of homemade dishes. Remember FAT EQUALS FLAVOR and I guarantee butter is much better for you than McDonalds or Candybars or pretzels for that matter.
Searing Meat
Getting a nice crust on the meat is a thing of beauty. I love a crusty skin on chicken or a nice charred crust on a ribeye. There are several ways to achieve this. First, the meat must be at room temp and dry. Marinated meat will not form a crust. There must be fat in the pan and the pan must be very hot. The following method works well with big steaks, skin-on chicken, pork tenderloin/chops and/or pieces of meat for braises, like pork butt, round roast, and/or brisket.
1) Bring meat to room temperature first (30 minutes or so)
2) Season your meat with any rub or simply with salt and pepper
3) Make sure meat is covered with rub, but not too wet. Pat it dry to be careful.
4) Preheat your heavy bottomed pan until it is super duper smoking hot
5) Add butter and oil (remember for a crust, fat is essential)
6) Put seasoned meat in pan-DON'T TOUCH or MOVE IT!!!!
7) After 3 minutes, peak and if there is a crust formed, flip. If not, let it keep cooking.
8) Flip and finish in hot oven until desired doneness
Making Pan Sauces
Sauces are fancy. That is all that is needed to say. They add color, flavor, and a sense of style to the meal. In classical cooking, there are 5 "mother sauces" which for the life of me, I can't remember all of them. I can remember four of them: hollondaise, veloute (brown sauce), bechamel (White sauce) and tomato sauce.
Now, don't ask me how to make these. I am not classically trained and honestly, I don't know how often these make into the rotation for people anyway. Maybe a bechamel from time to time for lasagna perhaps.
The sauces I am talking about are pan sauces that are a wonderful accompaniment to seared chicken, pork, lamb or beef. These are made by scraping up the fond (brown yummy meat bits) by deglazing with either wine or chicken stock and reducing...here is a simple recipe that serves as a base for many sauces.
Basic Pan Sauce
1) After meat is seared, remove and set aside.
2) To pot, add one diced shallot (1/4 onion would be fine) and one diced clove of garlic
3) Saute until soft. Add a 1/4 cup of wine, allow to evaporate
4) After wine is evaporated, add 1 cup of chicken stock and begin to reduce (heat should be on medium high to high)
5) Be careful when salting the sauce. The fond is often salty and the stock has salt in it too.
6) When sauce has reduced by half, add chopped thyme or rosemary and a dollop of either creme fraiche, sour cream, and/or full-fat cream. Finish with a pat of butter. This adds sheen and luxuriousness.
7) This sauce is perfect for lamb, pork chops, beef, and chicken. Use it!
Food is a way to show someone you care. Utilize these tricks and your food will taste unbelievable and special....perfect for the ones we love.
Cooking on Cast Iron
 |
| Boneless Skinless Chicken Thighs |
Recipe for Cast Iron Chicken (serves 3)
6 organic boneless skinless chicken thighs
Rub the chicken with any rub you like (I used a spanish inspired rub from the Spice House)
1-2 tbls Olive Oil
Salt and Pepper to taste
1) Heat up cast iron until smoking (or any heavy bottomed pan)
2) Put olive oil or butter on griddle
3) Place chicken on griddle (turn down heat to medium when chicken is on)
4) Cook until no longer pink-maybe like 3-4 minutes per side MAX
I served my chicken with a mixed vegetable concoction of green beans, bell peppers, green onions, and cherry tomatoes. Drizzle the whole thing with a little bit of oil and a spritz of lemon. Yummo!
Cheaper Pieces of Meat
To save money at the Balk household, I often attempt to cook less desirable pieces of meat. For example, pork steaks are far less expensive than pork tenderloin or pork chops. In addition, brisket, rump roast, and round roast are often cooked low and slow until they fall apart. The other night, I cooked lamb shoulder blade chops. They have them at Whole Foods a lot and are a fraction of the price of lamb chops and/or rack of lamb. They are very tasty and fatty, which is a plus for me. Paleo people love animal fat (some more than others, I should say). To impart extra flavor and to tenderize, I marinated the chops in a herb, garlic, and olive oil mixture.
Recipe for Marinated Lamb Shoulder Blade Chops (serves 4)
4 chops (usually around 8 ounces or so)
Handful of parsley, oregano, mint and cilantro (finely minced)
2 cloves of finely minced garlic
1/4 cup olive oil
1 tbls of dijon mustard
Before leaving for work in the morning, get a tupperware, large baggie or big bowl, and mix mustard, olive oil, s/p, herbs and garlic. It should sort of be like a vinaigrette. Salt and pepper each chop before putting them into the mixture. Massage the meat with the mixture (yes, it is important to impart as much flavor as possible into these guys). Leave all day.
When home, set up grill with a medium amount of charcoal. As always, place charcoal on one side so there is a hot and a cool side. When the fire is ready to go and the coals are ashy, put the chops on. You will want to check them frequently as the fat will burn. I would say that 3-4 minutes per side is all that is needed. Touch them for desired doneness.
A really neat trick is to use your face when assessing desired doneness. For medium rare, the meat should feel like your chin pad and for medium, the meat should feel like the end of your nose. Rare should feel like your cheek (I won't even list well-done because nothing should be well-done not even chicken). Let the meat rest after pulling it off for at least 5-7 minutes.
I served the lamb with lemon wedges and roasted brussel sprouts. Enjoy!
Recipe for Marinated Lamb Shoulder Blade Chops (serves 4)
4 chops (usually around 8 ounces or so)
Handful of parsley, oregano, mint and cilantro (finely minced)
2 cloves of finely minced garlic
1/4 cup olive oil
1 tbls of dijon mustard
Before leaving for work in the morning, get a tupperware, large baggie or big bowl, and mix mustard, olive oil, s/p, herbs and garlic. It should sort of be like a vinaigrette. Salt and pepper each chop before putting them into the mixture. Massage the meat with the mixture (yes, it is important to impart as much flavor as possible into these guys). Leave all day.
When home, set up grill with a medium amount of charcoal. As always, place charcoal on one side so there is a hot and a cool side. When the fire is ready to go and the coals are ashy, put the chops on. You will want to check them frequently as the fat will burn. I would say that 3-4 minutes per side is all that is needed. Touch them for desired doneness.
A really neat trick is to use your face when assessing desired doneness. For medium rare, the meat should feel like your chin pad and for medium, the meat should feel like the end of your nose. Rare should feel like your cheek (I won't even list well-done because nothing should be well-done not even chicken). Let the meat rest after pulling it off for at least 5-7 minutes.
 |
| Marinated chops cooking on first side |
 |
| Second side cooking. There should be a nice char on each side. |
I served the lamb with lemon wedges and roasted brussel sprouts. Enjoy!
Wednesday, August 24, 2011
Lunch of Champions

As I continue to eat like a caveman, I have found that creativity is key. I have been sauteing extra vegetables in the morning to add to the leftovers just so they are slightly different. Today's lunch is a gem: leftover lamb, homegrown green beans, squash and leftover roasted brussel sprouts. Just because it is lunch doesn't mean it shouldn't be tasty and exciting.
Tuesday, August 23, 2011
Cook like an Italian...

One of my favorite things to make for an easy supper is risotto. Risotto is a wonderful italian dish made of rice. There is so much starch in the rice that it makes a luxurious and creamy dish. Many think that it contains cream, but it does not. Now, I know that many think that it is quite difficult to do; however, it could not be easier. Remember I am not classically trained and perhaps some would say that my risotto is not loose enough. So be it. I like it this way! Someone got kicked off of Top Chef for too stiff Risotto!
Risotto is so versatile and is a vehicle for so many things. I will use leftover vegetables, grilled meats or seafood and once you have the technique, you won't ever be afraid to make it. Just get creative and throw in whatever you want... The above picture is corn, caper, and shrimp risotto. I love anything salty and briny like capers and/or olives. Although, my husband does not care for capers. Truly, anything will work here. The only stipulation is that arborio or carnarolli rice is necessary. There will not be enough starch otherwise.
Recipe for Risotto with Shrimp, Capers, and Fresh Corn (serves two with leftovers)*
*most recipes call for way more butter, but I am not sure it is necessary
1 cup arborio or carnarolli rice (found at most fine supermarkets)
2 tbls butter
2 tbls EVOO
1 finely chopped white onion
2 cloves garlic
2 ears fresh corn
1/4 cup of capers
3/4 pound of good quality medium sized peeled and deveined shrimp
Chicken Stock (around 6-8 cups) Warmed
Fresh Parmigiano Regiano at the end
Saffron threads (optional)
Fresh parsley for garnish (also optional)
For the Rice:
1. Melt one tbl of butter and two tbls of olive oil in a heavy bottomed saute pan (on Medium heat)
2. Add chopped onion and garlic and coat with the fat. Saute for 5 minutes
3. Add rice in and toast with butter and oil. The rice needs to be coated with fat
4. Stir occasionally until the rice is slightly toasted (it should start to smell good)
5. Slowly add one cup of hot stock (make sure the chicken stock is warmed)
6. Stir (you will continue to do step 5 and 6 over and over again) until liquid is absorbed
7. Add more stock. Repeat and Repeat. Taste as you go adding salt and pepper as preferred
Please keep in mind that this cooking method requires attention, patience, and constant stirring. Stirring helps the starches release. This whole process takes around 20-25 minutes. Ultimately, it is ready when you taste the rice and it is slightly al dente (which is italian for "to the tooth"). It should have a slight bite, but also be soft.
8. While the Risotto is cooking, assemble your extra ingredients.
9. Cut your corn off of the cob. You will add it to the risotto in the last 3-4 minutes of cooking.
Side note: If using sausage, you would want to cook the sausage and then remove it from the pan and then cook your rice in the same pan (yummy sausage bits). I used shrimp so I cooked them on my trusty cast iron skillet, which was a gift from my mom and is my all-time favorite kitchen gadget.
10. Salt and pepper the shrimp and drizzle with olive oil.
11. Cook until the tails are curled and the color is pink.
12. Measure out capers
13. Add corn to risotto and stir. Let heat through.
14. Grate parm and add to the risotto.
15. Add last tbl of butter and stir vigorously*
16. Add capers and shrimp and serve immediately.
17. Drizzle with EVOO for great flavor and pizazz!
*Ann Burrell stirs that fire out of her risotto at the end, which is a trick she learned in Italy.
This truly is one of my favorite things to cook and one of the foods I miss the most now that I am carb-free. Perhaps a special occasion? Enjoy!
Biking on the Northshore

We went biking a couple of weeks ago when it was super windy and the waves were huge. We rode past the Bahai temple in Wilmette, which is an all-faith temple and is the only one of its kind in all of North America. How interesting that it is in Wilmette, IL. It is absolutely gorgeous, perched right by Lake Michigan, and is open to the public.
 |
| Lake Michigan at Gilson Park, Wilmette, IL |
Chicago in the Summer

My hubs and I always say that there is no better place to live than Chicago in the summer. It is warm, bug-free (for the most part), and filled with activity. We have been fortunate to do some fun things this summer, including attending a gala for the opening night of Lolapalooza. What a great picture my cousin took of us sitting at the party with the skyline behind us. It was a super fun night and the food was catered by the most popular food trucks in Chicago. I have to say that I somewhat disappointed in the food. The Mac and Cheese truck was good, but some of the other food items were slightly disappointing. I noticed right off the bat that the food was pre-cooked so that the trucks could serve the people faster. This is probably why the food was not the best. Oh well, Pat and I decided that starting a food truck is maybe in our future (we have lots and lots of dreams).
Monday, August 22, 2011
Sausage Stuffed Squash

Recipe for Sausage Stuffed Squash (serves two hungry eaters)
One large homegrown zucchini cut in half or two medium grocery store bought zucchini (cut in 4)*
8 ounces of organic breakfast sausage (hot italian or regular italian sausage would work)
1/2 vidalia onion
1 diced small bell pepper
1/2 fresh tomato
Splash of white wine for deglazing the yummy sausage bits (chicken stock is fine too)
10 ounces of frozen spinach (squeezed of all liquid!)
Extra Virgin Olive Oil
Salt and Pepper
*if using small squash, the cook time will be decreased.
Preheat oven to 400. Cut each squash in half vertically from the tip to the base. Scrape out the insides of the squash. Put in heavy bottomed pan and drizzle with extra virgin olive oil. In the meantime, brown sausage in a saute pan and break up (over medium high heat). When browned, add onion, pepper, and tomato. Stir veggies around in the fat of the sausage and mix together. Let brown while occasionally stirring. Deglaze with white wine or chicken stock. When the liquid is absorbed, add frozen spinach and decrease heat and cover for 10 minutes. Add salt and pepper as needed. Put mixture into the squash and place uncovered in the oven for 45 minutes if using large squash and 30 minutes if using medium squash. The squash are ready when they are soft on the outside. Enjoy!
Grilled Blackened Pork Chops

Recipe for Grilled Pork Chops
Four bone-in center cut pork chops (less than one inch thick)*
Blackening seasoning**
Extra Virgin Olive Oil
Juice of lemon or lime
*rub vigorously with spice mixture and let sit for two hours (overnight if possible)
**see recipe below
Rub your chops with a generous amount of rub. Drizzle with olive oil. Set up grill with coals on one side. When the fire is ready (coals should be slightly ashy), place pork chops on hot side of grill. You really want the fat around the edges to get charred. Once nice and charred (3 minutes per side) move chops over to the cooler side of grill and cover. Using an instant read thermometer, pork chops should be cooked to like 140 (it is okay if they are slightly pink). When you touch them, they should have a little give, but not be too hard. Once finished, let sit for 5 minutes and drizzle with lemon or lime.
Blackening Spice (wonderful on all meats)
Years ago, a chef at the Radisson taught me how to make this rub. He could make a mean prime rib. It is really an eye ball kind of thing. He taught me how to make it on a plate. You don't need to know exact measurements, I don't think. This recipe makes a lot. You can store this in the freezer or in a tupperware in your spice drawer.
The base of this rub is paprika. You want half of your plate to be paprika. Then you add equal parts garlic powder, chili powder, onion powder, cumin, pepper and salt (on the other side of the plate). You would then add cayenne. This spice is hot and you want to use it carefully. Taste as you go. It should be spicy, salty, and flavorful.
Sunday at the Beach


Recipe for Chimichurri (great with grilled meat).
-Chimichurri is an Argentinian sauce that is often served with grilled meat
Good handful of each: fresh parsley, oregano, and mint.
Two cloves of garlic
Salt and Pepper to taste
Extra Virgin Olive oil (until loose, between 1/4 and 1/2 cup)
Splash of red wine vinegar or juice of one lemon
1/2 tsp of red pepper flakes
Place herbs, garlic, and red pepper flakes in a blender or food processor. Pulse several times to break things up. Then slowly stream in EVOO until the sauce is loose. Then add a splash of acid. Taste and add salt and pepper as preferred. It is wonderful on vegetables or grilled meats.
Subscribe to:
Posts (Atom)